


Updating Angular 8 code in S3 while using CloudFront for distribution.
Problem Statement
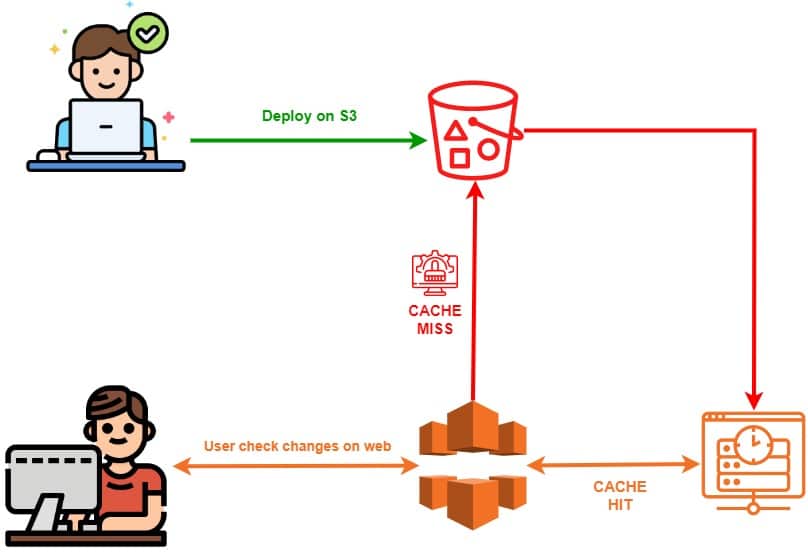
Whenever we deploy updated Angular 8 code in S3, it does not get reflected in CloudFront, it still points to old code (caching feature). But after few hours it starts behaving fine and distributes new files, of course that is something not acceptable to any organization and we always wonder on why CloudFront takes so much time to refresh S3 files is that the default behavior or we are missing something during deployment.
After some sort of Googling (
( default way to solve the problem)I found the root cause and resolution which fortunately worked for me. I would like to share my experience with you here. Let’s have a look.
Root Cause
CloudFront is a fast content delivery network (CDN) service that securely delivers data, videos, applications, and APIs to customers globally with low latency, high transfer speeds, this speed it gets by caching at edge location, so it does not contact to S3 (origin) all the time whenever there is request for the same resource, and that is the reason when you deploy the updated code to S3 you would still see the same response on Browser. By default, CloudFront caches files in edge locations for 24 hours
Resolution
There are few ways to tackle this and all are good but this depends on your choice & use case
Create new folders with version number and point Cloud Front to that folder.
This is the mostly used and popular way, since it allows you to have old as well as new code available and any time you can roll back to old code in case that is required. But this would add a new step in deployment process to change in CloudFront distribution list everytime you do the deployment.
Invalidate Angular build files from edge caches so that after deployment CloudFront returns to the origin to fetch the latest code. I found this better as once admin & team will decide and configure list of files those need to be taken latest, CloudFront would take care of this.
Invalidation steps:
- Determining Which Files to Invalidate : you can invalidate all the files in bucket, all the files in any given folder of the bucket or you can also provide type of files which you want to invalidate say JPEG files, TS files etc.
- To invalidate the default root object (file), specify the path the same way that you specify the path for any other file
- You can invalidate only files that are associated with a web distribution
- Case sensitive : index.jpg is different from Index.jpg
- Select the distribution for which you want to invalidate files.
- Choose Distribution Settings.
- Choose the Invalidations tab.
- Choose Create Invalidation.
- For the files that you want to invalidate, enter one invalidation path per line
- Note: Invalidation is not for free.